Monday, 1 June 2015

How to make QR code for android app and website

You can create QR code direct via online generator. its very simple. In web world their are many online generator, which you can use for create QR code in image mode.

How to make QR code for android app and website dynamically.

Dynamically generating a QR code with PHP.

What is QR Code? (Quick Response Code) is the trademark for a type of matrix barcode (or two-dimensional barcode).
QR codes are a popular type of two-dimensional barcode. They are also known as hardlinks or physical world hyperlinks. QR Codes store up to 4,296 alphanumeric characters of arbitrary text. This text can be anything, for example URL, contact information, a telephone number, even a poem! QR codes can be read by an optical device with the appropriate software. Such devices range from dedicated QR code readers to mobile phones.
A QR code consists of black modules (square dots) arranged in a square grid on a white background, which can be read by an imaging device (such as a camera) and processed using Reed–Solomon error correction until the image can be appropriately interpreted. The required data are then extracted from patterns present in both horizontal and vertical components of the image.


Generate QR code in php

You can generate QR code using QR Codes API

To use this , basically:
( https://chart.googleapis.com/chart?chs=300x300&cht=qr&chl=http%3A%2F%2Fwww.google.com%2F&choe=UTF-8 )
  • 300x300 is the size of the QR image you want to generate,
  • the chl is the url-encoded string you want to change into a QR code, and
  • the choe is the (optional) encoding.
The link, above, gives more detail, but to use it just have the src of an image point to the manipulated value, like so:

( <img src="https://chart.googleapis.com/chart?chs=300x300&cht=qr&chl=http%3A%2F%2Fwww.google.com%2F&choe=UTF-8" title="Link to Google.com" /> )


Demo:


To Learn More Please Click Here.

Video Tutorial for generating QR code


create qr code in android. qr code scanner example.


for create in android you need to ZXING library in your project.
We will call on the resources in this open apk library within our app, retrieving and processing the returned results.

How to use:
  • Create an Activity which implements onQRCodeReadListener, and let implements required methods
  • Make sure Activity orientation is PORTRAIT and give Camera permision in the manifest.xml
  • Add a "QRCodeReaderView" in the layout editor like you actually do with a button for example
 <com.dlazaro66.qrcodereaderview.QRCodeReaderView
        android:id="@+id/qrdecoderview"
        android:layout_width="match_parent"
        android:layout_height="match_parent" />
  • In your onCreate method, you can find the view as usual, using findViewById() function.
  • Set onQRCodeReadListener to the QRCodeReaderView.
  • Start & Stop camera preview in onPause() and onResume() overriden methods.
  • Use onQRCodeReadListener callbacks as you want.
  • You can place widgets or views over QRDecoderView
    public class DecoderActivity extends Activity implements OnQRCodeReadListener {

    private TextView myTextView;
    private QRCodeReaderView mydecoderview;

    @Override
    protected void onCreate(Bundle savedInstanceState) {
        super.onCreate(savedInstanceState);
        setContentView(R.layout.activity_decoder);

        mydecoderview = (QRCodeReaderView) findViewById(R.id.qrdecoderview);
        mydecoderview.setOnQRCodeReadListener(this);

        myTextView = (TextView) findViewById(R.id.exampleTextView);
    }


    // Called when a QR is decoded
    // "text" : the text encoded in QR
    // "points" : points where QR control points are placed
    @Override
    public void onQRCodeRead(String text, PointF[] points) {
        myTextView.setText(text);
    }


    // Called when your device have no camera
    @Override
    public void cameraNotFound() {

    }

    // Called when there's no QR codes in the camera preview image
    @Override
    public void QRCodeNotFoundOnCamImage() {

    }

    @Override
    protected void onResume() {
        super.onResume();
        mydecoderview.getCameraManager().startPreview();
    }

    @Override
    protected void onPause() {
        super.onPause();
        mydecoderview.getCameraManager().stopPreview();
    }
}

Add it to your project

Add QRCodeReaderView dependency to your build.gradle
dependencies{
    compile 'com.dlazaro66.qrcodereaderview:qrcodereaderview:1.0.0'
}


download full source code for qr code generator here:

QR CODE GENERATOR 

 Click this link for Eclipse Project EXAMPLE FOR QR CODE its very useful.


Sunday, 31 May 2015

Cannot install Office 2013 - Seup cannot find or validate an installation file


I can't install office 2013 error :Setup can't find or validate an installation file. Please try reinstall Office from your installation source

Setup can't  find or validate an installation file. Please try reinstall Office from your installation source, or if you install from a downloaded package,please re-install. if you continue to have problems,please contact Microsoft or your system adminstrator..
 
Ans-:
Please follow the stpes below to check if you can fix the problem:
1. Copy all the files from the Microsoft Office 2013 folder and paste those to into a folder on your hard drive.
2. From the copied folder, find the setup.exe file. Select that file and and right-click on it and choose Run as administrator option from the menu items.
3. After completing step 2, The User Account Control window will opened and will ask you Do you want to allow the following program to make changes to this computer? with the option Yes and No. Just choose Yes to continue installation.


Friday, 29 May 2015

Fatal error: Allowed memory size of 134217728 bytes exhausted opencart error

Fatal error: Allowed memory size of 268435465 bytes exhausted
(tried to allocate 280559520) in Unknown on line 0

How to fix the "Allowed memory size Error" in localhost

The php memory resource can be increased in the php.ini located in the public_html or in localhost. The following steps will explain how to set the php.ini to allow a larger amount of memory use.

 
1. If you have access to the php.ini file,  open xampp\php\php.ini file and find memory_limit, then       set the memory_limit option to 512M
2. now open your project folder and you will find php.ini file set memory_limit option and place  
    512M there.
2. If you don't have access to it, you can try to set it in the .htaccess with: open your project          
   .htaccess and place this line
    php_value memory_limit 512M;
3. now open your project admin folder you will find again php.ini file, set 
    memory_limit 512M;
3. If you change it on php.ini file don't forget restart the server after change the value.
Your server have the memory_limit set to 64Mb and Open Cart need a little more.

I hope this help you.

Thursday, 28 May 2015

How to customize opencart home page

How to customize opencart home page. as per your question, you want to add more products on home page..like featured...

  1.  go to catalog\view\theme\default\template\module\featured.tpl
  2. then you will see lots of code here. read codes, and see every code works on its own criteria and function such as product description, price, add to cart, wishlist etc in feature container.
  3. copy all code of this tpl file.
  4. now paste it at the end of the code where code it ended up. 
  5. save this file.
  6. now reload home page, and you will found more product here like feature container. 
  7. it just simple as making maggi noodles in 2 minutes. 
  8. learn more about MVC and opencart and PHP................ 
and as per our last discussion that memory error were not opencart problem. i think this was your system problem..if it will occurs again. then you can concern me about it. i will mention in my next post in this blog..thanks.......

Wednesday, 27 May 2015

How to Update Windows 8 to Windows 8.1

Before you begin: backup your system 

Ready? Now you can download the free update from the Windows Store.

1. Go to the Start screen, and tap or click the Store tile.


2. In the Store, tap or click the Windows 8.1 or Windows RT 8.1 update. if you don't see the update on the Store home screen, see Why can't I find the update in the Store?
3. Tap or click Download.
4. The update will download and install in the background while you use your PC to do other things. The installer will check to make sure you have enough disk space, that your apps and devices will work with Windows 8.1 or Windows RT 8.1, and that you have all the required updates.
In some cases, the installer might find something you need to take care of before you can continue installing the update. If so, you'll see a message telling you what you need to do.


Note: If the installation is interrupted for any reason, you can restart the update from where you left off by going back to the Store and downloading the update again.

Restart

After the update is downloaded and the first phase of the installation is complete (which could take between 15 minutes and a few hours, depending on your system and your connection speed), you'll see a message telling you that your PC needs to restart. It will give you 15 minutes to finish what you’re working on, save your work, and close your apps, and then it will restart your PC for you. Or you can restart it yourself. 


 Note:
  • If you leave your PC before it's ready to restart, be sure to save your work and close any desktop apps you're using to make sure you don't lose anything when it restarts automatically. Your PC might need to restart more than once, depending on how it’s set up, and whether additional updates are needed.
  • Restarting will take longer than usual—from 20 minutes to about an hour—while the update is applied. During this time, you won't be able to use your PC.

    Choose your settings

    Express settings

    You'll see a list of recommended settings, called express settings. To accept these settings and continue, tap or click Use express settings. You can change any of these settings later, after you finish setting up. If you'd like to change some of these settings now, tap or click Customize.


    Sign in

    Next, you'll be asked to sign in. If you already use a Microsoft account to sign in to Windows 8 or Windows RT, your account name will be filled in for you. If you previously used a local account, you can still use it to sign in.

    If you have MS account then do login, if not then create.

    OneDrive cloud storage

    If this is your first time setting up a PC with Windows 8.1 or Windows RT 8.1, you'll see the new OneDrive options.
    If you already have another PC running Windows 8.1 or Windows RT 8.1, and you chose to sync settings on that PC, then your OneDrive settings will also sync from your existing PC to this one, and you might not see this screen.


    If you click Next on this screen, your PC will use these default OneDrive settings:
  • Photos you take with this PC are saved to your camera roll folder on this PC, and a smaller copy of each photo is automatically backed up to your OneDrive.
  • When you create a new document, the default save location is OneDrive. But you can always choose to save individual documents locally or on another drive.
  • Windows will save a backup copy of your PC settings to OneDrive. If something ever happens to your PC and you need to replace it, your settings are saved in the cloud and you can transfer them to a new PC instantly.
You can change any of these settings later in PC settings. If you'd prefer to turn off all of these settings now, tap or click Turn off these OneDrive settings (not recommended).

Welcome to the new Windows


For more info Please click here


Android transition or android animation example

Android Transition or you can say that android animation in simple and general language.

Download and view source code here... 

how to use android animation code sample:

please read this awesome developer website  post..

Click here for read more. 

Reference by -Bolot Kerimbaev 


Android Animations - Tutorial 

 Use Animator and AnimatorListener

The superclass of the animation API is the Animator class. Typically the ObjectAnimator class is used to modify the attributes of an object.
You can also add an AnimatorListener class to your Animator class. This listener is called in the different phases of the animation. You can use this listener to perform actions before or after a certain animation, e.g. add or remove a View from a ViewGroup.

Full Article Here. 

 For better way to learn animation seriously please read this link (developer.android.com) seriously..and implement this in your android code editor.  

Simple Animation: 

Simply create two files one xml and one Activity file. simply copy code and paste it.
Note- but set id, image and other attributes location and name according to yours.

1. xml File

Xml activity_main:

 <?xml version="1.0" encoding="utf-8"?>
 <RelativeLayout xmlns:android="http://schemas.android.com/apk/res/android"
  android:id="@+id/rl_main"
  android:layout_width="match_parent"
  android:layout_height="match_parent"
  android:background="@drawable/autograph_bg" >

 <RelativeLayout
    android:id="@+id/rl_footer"
    android:layout_width="fill_parent"
    android:layout_height="70dp"
    android:layout_alignParentBottom="true"
    android:background="@drawable/down_manu_bar1" >

    <ImageView
        android:id="@+id/iv_new_file"
        android:layout_width="25dp"
        android:layout_height="25dp"
        android:layout_alignParentLeft="true"
        android:layout_centerVertical="true"
        android:layout_marginLeft="18dp"
        android:onClick="onNewFileClick"
        android:src="@drawable/file_icon" />

    <TextView
        android:id="@+id/tv_new_file"
        android:layout_width="wrap_content"
        android:layout_height="wrap_content"
        android:layout_alignLeft="@+id/iv_new_file"
        android:layout_below="@+id/iv_new_file"
        android:text="New"
        android:textColor="#ffffff" />

    <ImageView
        android:id="@+id/iv_insert"
        android:layout_width="25dp"
        android:layout_height="25dp"
        android:layout_alignTop="@+id/iv_new_file"
        android:layout_marginLeft="30dp"
        android:layout_toRightOf="@+id/iv_new_file"
        android:src="@drawable/insert_icon" />

    <TextView
        android:id="@+id/tv_insert"
        android:layout_width="wrap_content"
        android:layout_height="wrap_content"
        android:layout_alignLeft="@+id/iv_insert"
        android:layout_below="@+id/iv_insert"
        android:text="Insert"
        android:textColor="#ffffff" />

    <ImageView
        android:id="@+id/iv_up_arrow"
        android:layout_width="45dp"
        android:layout_height="45dp"
        android:layout_centerHorizontal="true"
        android:layout_centerVertical="true"
        android:paddingBottom="10dp"
        android:src="@drawable/up_arrow" />

    <ImageView
        android:id="@+id/iv_down_arrow"
        android:layout_width="45dp"
        android:layout_height="45dp"
        android:layout_centerHorizontal="true"
        android:layout_centerVertical="true"
        android:background="@drawable/down_arrow"
        android:paddingBottom="10dp"
        android:visibility="gone" />

    <ImageView
        android:id="@+id/iv_save"
        android:layout_width="25dp"
        android:layout_height="25dp"
        android:layout_alignTop="@+id/iv_insert"
        android:layout_marginLeft="30dp"
        android:layout_toRightOf="@+id/iv_up_arrow"
        android:src="@drawable/save" />

    <TextView
        android:id="@+id/tv_save"
        android:layout_width="wrap_content"
        android:layout_height="wrap_content"
        android:layout_alignLeft="@+id/iv_save"
        android:layout_alignParentBottom="true"
        android:text="Save"
        android:textColor="#ffffff" />

    <ImageView
        android:id="@+id/iv_settings"
        android:layout_width="25dp"
        android:layout_height="25dp"
        android:layout_alignTop="@+id/iv_save"
        android:layout_marginLeft="27dp"
        android:layout_toRightOf="@+id/tv_save"
        android:paddingTop="2dp"
        android:src="@drawable/icon_settings" />

    <TextView
        android:id="@+id/tv_settings"
        android:layout_width="wrap_content"
        android:layout_height="wrap_content"
        android:layout_alignParentBottom="true"
        android:layout_marginLeft="260dp"
        android:text="Settings"
        android:textColor="#ffffff" />
 </RelativeLayout>

 </RelativeLayout>


2. code file

My Activity MainActivity:

import android.os.Bundle;
import android.app.Activity;
import android.content.Intent;
import android.view.Menu;
import android.view.View;
import android.view.View.OnClickListener;
import android.view.animation.Animation;
import android.view.animation.Animation.AnimationListener;
import android.view.animation.AnimationUtils;
import android.view.animation.TranslateAnimation;
import android.widget.Button;
import android.widget.ImageView;
import android.widget.RelativeLayout;

public class MainActivity extends Activity {

RelativeLayout rl_footer;
ImageView iv_header;
boolean isBottom = true;
Button btn1;

@Override
protected void onCreate(Bundle savedInstanceState) {
    super.onCreate(savedInstanceState);
    setContentView(R.layout.activity_main);
    rl_footer = (RelativeLayout) findViewById(R.id.rl_footer);
    iv_header = (ImageView) findViewById(R.id.iv_up_arrow);
    iv_header.setOnClickListener(new OnClickListener() {

        @Override
        public void onClick(View v) {
            // TODO Auto-generated method stub
            iv_header.setImageResource(R.drawable.down_arrow);
            iv_header.setPadding(0, 10, 0, 0); 
            rl_footer.setBackgroundResource(R.drawable.up_manu_bar);
            if (isBottom) {
                SlideToAbove();
                isBottom = false;
            } else {
                iv_header.setImageResource(R.drawable.up_arrow);
                iv_header.setPadding(0, 0, 0, 10);
                rl_footer.setBackgroundResource(R.drawable.down_manu_bar1);
                SlideToDown();
                isBottom = true;
            }

        }
    });

}

public void SlideToAbove() {
    Animation slide = null;
    slide = new TranslateAnimation(Animation.RELATIVE_TO_SELF, 0.0f,
            Animation.RELATIVE_TO_SELF, 0.0f, Animation.RELATIVE_TO_SELF,
            0.0f, Animation.RELATIVE_TO_SELF, -5.0f);

    slide.setDuration(400);
    slide.setFillAfter(true);
    slide.setFillEnabled(true);
    rl_footer.startAnimation(slide);

    slide.setAnimationListener(new AnimationListener() {

        @Override
        public void onAnimationStart(Animation animation) {

        }

        @Override
        public void onAnimationRepeat(Animation animation) {
        }

        @Override
        public void onAnimationEnd(Animation animation) {

            rl_footer.clearAnimation();

            RelativeLayout.LayoutParams lp = new RelativeLayout.LayoutParams(
                    rl_footer.getWidth(), rl_footer.getHeight());
            // lp.setMargins(0, 0, 0, 0);
            lp.addRule(RelativeLayout.ALIGN_PARENT_TOP);
            rl_footer.setLayoutParams(lp);

        }

    });

}

public void SlideToDown() {
    Animation slide = null;
    slide = new TranslateAnimation(Animation.RELATIVE_TO_SELF, 0.0f,
            Animation.RELATIVE_TO_SELF, 0.0f, Animation.RELATIVE_TO_SELF,
            0.0f, Animation.RELATIVE_TO_SELF, 5.2f);

    slide.setDuration(400);
    slide.setFillAfter(true);
    slide.setFillEnabled(true);
    rl_footer.startAnimation(slide);

    slide.setAnimationListener(new AnimationListener() {

        @Override
        public void onAnimationStart(Animation animation) {

        }

        @Override
        public void onAnimationRepeat(Animation animation) {
        }

        @Override
        public void onAnimationEnd(Animation animation) {

            rl_footer.clearAnimation();

            RelativeLayout.LayoutParams lp = new RelativeLayout.LayoutParams(
                    rl_footer.getWidth(), rl_footer.getHeight());
            lp.setMargins(0, rl_footer.getWidth(), 0, 0);
            lp.addRule(RelativeLayout.ALIGN_PARENT_BOTTOM);
            rl_footer.setLayoutParams(lp);

        }

    });

}

@Override
public boolean onCreateOptionsMenu(Menu menu) {
    // Inflate the menu; this adds items to the action bar if it is present.
    getMenuInflater().inflate(R.menu.main, menu);
    return true;
}

 }
 

And for more please ask me if any doubt.. also you should google first for this.......


Animated transition between an activity and another:

You can set up animations (like slide) when you switch between activities like this :
In the res folder, create an anim folder
For example, put two xml files for a slide effect :

slide_in.xml

<set xmlns:android="http://schemas.android.com/apk/res/android"
         android:shareInterpolator="false">
        <translate android:fromXDelta="100%" android:toXDelta="0%"
          android:fromYDelta="0%" android:toYDelta="0%"
         android:duration="200"/>
  </set>
 
slide_out.xml

<set xmlns:android="http://schemas.android.com/apk/res/android"
         android:shareInterpolator="false">
      <translate
       android:fromXDelta="100%" android:toXDelta="0%"
       android:fromYDelta="0%" android:toYDelta="0%"
       android:duration="200" />
    </set>
 
now in code file just write this.


Intent i = new Intent(YourActivity.this, OtherActivity.class);
    this.startActivity(i);
    overridePendingTransition(R.anim.slide_in, R.anim.slide_out);
 
If you are testing that on a real device, don't forget to allow it to 
play animations (Settings -> Display -> Animations -> All 
Animation) 


How To Install Windows XP/7/8/8.1 From a USB Device


(How to create a bootable USB flash drive to install Windows 8 or 8.1)

(How to Make a Bootable USB Disk/Pendrive(PD) for Windows 8, Windows 7, Windows XP) (Pendrive ko bootable kese banaye windows install karne k liye.)

For Windows 8.1 Please Read Windows 8.1 Product Guide Here.

Free Download Windows 8.1 ISO

Requirements:
  • A flash drive (4 GB for 32-bit, 8 GB for 64-bit)
  • A Windows XP/7/8/8.1 DVD or ISO..
  • Access to a working computer (with a DVD drive if you have a Windows 8 DVD) with Windows 8, Windows 7, Windows Vista, or Windows XP installed.

How to Create a Windows 8 Installation DVD or USB Drive

  Create bootable USB drives the easy way. (I think this the easiest way, I also tried this at many times)

Rufus is a utility that helps format and create bootable USB flash drives, such as USB keys/pendrives, memory sticks, etc.
It can be especially useful for cases where:
  • you need to create USB installation media from bootable ISOs (Windows, Linux, UEFI, etc.)
  • you need to work on a system that doesn't have an OS installed
  • you need to flash a BIOS or other firmware from DOS
  • you want to run a low-level utility
DOWNLOAD Rufus 2.1 (2.2 MB) Here.
 Rufus 2.1 (2.2 MB)


Other option for boot pendrive/USB disk/USB flash drive:

Boot pendrive/USB disk/USB flash drive:

To create a bootable USB flash drive the easy way, you can download the Windows 7 USB/DVD download tool from the Microsoft Store. If you feel adventurous and are comfortable with command line tools, below are the step-by-step instructions for installing Windows 8 Developer Preview from a USB flash drive. But be warned, if you are not comfortable with command line tools, downloading the Windows 7 USB/DVD download tool is a much better option and will save you the effort of reading the remainder of this blog.

Instructions (using the command line)

At a high level, the steps are:
  1. Mount the Windows 8 Developer Preview ISO image on your computer
  2. Format a USB flash drive
  3. Copy the Windows 8 files onto the USB flash drive
  4. Make the USB flash drive bootable
  5. Install Windows 8 from the bootable flash drive 

Step 1: Mount the Windows 8 Developer Preview ISO image on your computer

The first step is to mount the ISO image on your computer. Since Windows 7 doesn’t have the capability to mount an ISO image, you’ll have to use a 3rd party tool.
  1. Download the Windows Developer Preview ISO image (choose one of the three available)
  2. Using your favorite ISO image software, mount the ISO image on your computer
To check that the ISO image mounted successfully, you should be able to browse the Windows 8 files, as shown below.


Step 2: Format a USB flash drive

In case you’re wondering how big of a USB flash drive you need, an 8GB drive is perfect since it can accommodate any of the three available ISO images. Here are the steps to format a USB flash drive.
  1. Insert a USB flash drive into your computer
  2. Start a Command Prompt as an Administrator and type diskpart. This starts the Disk Partition tool which you need to use to format the flash drive. Once you see the DISKPART command prompt, type in the following commands
  3. DISKPART> list disk                                 /* shows list of active disks */
  4. DISKPART> select disk #                         /* # is the number for your USB flash drive */
  5. DISKPART> clean                                     /* deletes any existing partitions on the USB flash drive */
  6. DISKPART> create partition primary     /* create a primary partition on the USB flash drive */
  7. DISKPART> select partition 1                 /* select the newly created partition */
  8. DISKPART> active                                    /* make the new partition active */
  9. DISKPART> format FS=NTFS                 /* format the USB drive with NTFS file system */
  10. DISKPART> assign                                   /* assign a volume and drive letter to the USB drive */
  11. DISKPART> exit                                        /* exit Disk Partition */
At this point, your USB flash drive should be showing up in Windows Explorer and have a drive letter assigned to it, e.g. F:\.

Step 3: Make the USB flash drive bootable

We just need to make the USB flash drive bootable before copying the files. To do this, you can use the Boot Sector Registration Tool (bootsect.exe) which is located in the boot folder of the Windows 8 ISO image.
  1. Start a Command Prompt as an Administrator and CHDIR into the boot folder of the Windows 8 ISO image, e.g. I:\boot where I:\ is the drive where the ISO image is mounted
  2. Type bootsect /nt60 E:                              /* where E: is the drive assigned to the USB flash drive */ 


Step 4: Copy the Windows 8 files onto the USB flash drive

From a command line, use XCOPY to copy the Windows 8 files to the USB flash drive . In the example below, I:\ is the drive where the ISO image is mounted. F:\ is the USB flash drive.
XCOPY I:\*.* F:\ /E /F /H

Step 5: Install Windows 8 from the bootable flash drive

Finally, follow these instructions to install Windows 8 on your computer.
  1. Remove your USB flash drive from your "source" computer and insert it into the "target" computer where you want to install Windows 8
  2. On the computer where you are installing Windows 8, press the power button to turn on the computer
  3. During boot up, select the USB flash drive to boot from (if you don't see the USB flash drive as an option, you may have to adjust your BIOS settings)
  4. Follow the instructions to install Windows 8 Developer Preview
Here is a screen shot from the boot manager on my computer showing the USB flash drive as an option.


Please follow steps and now you can work on window...yipiieeeeeeee.


Windows 7
The first thing you need is a Windows ISO or an image file. This is a virtual copy of a Windows installation DVD and you can source this legally from Microsoft without a product key. Here are the links for various edition of Windows 7.
Windows 7 Ultimate (32 bit)
Windows 7 Ultimate (64 bit)
Windows 7 Professional (32-bit)
Windows 7 Professional (64-bit)
Windows 7 Home Premium (32-bit)
Windows 7 Home Premium (64-bit)

You'll still need a valid product key when you reinstall Windows so make sure you keep that safely.
Once you've downloaded the Windows 7 ISO file, follow these steps to burn it to a pen drive.
  1. Download the Windows USB/DVD tool from here and run it.
  2. Click Browse and select the downloaded Windows 7 ISO file.
  3. Click Next.
  4. The next page asks whether you want to save this file to a USB or a DVD. Click USB device.
  5. Connect a pen drive with at least 4GB space to your computer. Make sure you back up all data on the pen drive to your computer as it will be erased during this process.
  6. Select your pen drive from the drop down menu and click Begin copying.
  7. When this process is complete, you'll have a bootable Windows 7 USB ready.


    Windows 8
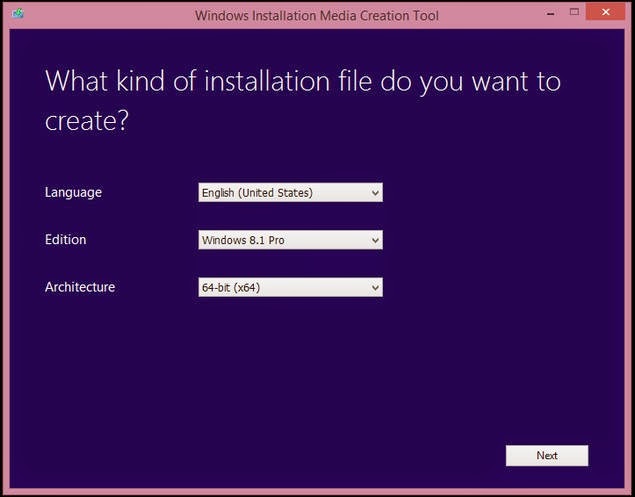
  1. Download the Windows Installation Media Creation Tool from here and run it.
  2. Select the Language from the first drop-down menu.
  3. Then select the Edition of Windows you want to install. Your choices are: Windows 8.1, Windows 8.1 N, Windows 8.1 Pro, Windows 8.1 Pro N and Windows 8.1 Single Language.
  4. In the third drop-down menu next to Architecture choose whether you want a 32-bit or 64-bit version of the OS. If your computer has less than 3GB RAM, then pick 32-bit. If it has more than 3GB RAM, pick 64-bit. If you need to see which version you're running right now, right click on My Computer and select Properties. There, you'll see the information you need under Windows Edition and System type respectively.
  5. Click Next.
  6. Plug in a USB drive to your computer. Make sure that it has at least 4GB space. If there's any important data on the drive, create a backup as this process will erase the pen drive completely.
  7. Now you'll be asked to choose where to save the ISO file. Choose USB flash drive.
  8. Click Next.
  9. You'll see a list of USB drives connected to your computer. Select your pen drive from the list and click Next.
  10. Now the Media Creation Tool will begin downloading the ISO straight to your pen drive. When the download completes, click Finish.
Warning

  • If you format a partition during installation, any data on the partition will be erased. Be sure to back up any data you want to keep before you begin.
Windows XP
  1. Go to the Windows XP SP3 ISO download page.
  2. Select the language from the drop-down menu and click the big red Download button.
  3. Download a free programme such as ISOtoUSB to burn the image to a pen drive. There are a lot of apps that let you do this and you can use any of these. We found ISOtoUSB easy to use and light, so we picked it over others.
  4. Install ISOtoUSB on your computer and open it.
  5. Click Browse and select the downloaded Windows XP ISO file.
  6. Plug in a pen drive with at least 1GB free space to your computer. All data on this pen drive will be erased so make sure you have a backup.
  7. In ISOtoUSB, select the pen drive from the drop-down menu.
  8. Click the checkbox next to Bootable
  9. Click Burn.
When the process is complete, a bootable Windows XP USB drive will be ready.

Booting and installing Windows

When you're booting up the computer, on the very first screen, you'll see a text which says something like "Press Del to Enter BIOS". Press whatever key is listed - this is usually Delete, or one of F1, F2, F8, or F12 - when the computer is booting, to enter the BIOS. There, you need to find a menu like Advanced BIOS settings, and select USB as the primary boot device. Now, you need to save and exit BIOS - the key to do so will be listed on-screen, but it is usually F10. Plug in the USB, and when you reboot, you'll start the install process for Windows on your computer. Follow on screen instructions to install Windows 8, Windows 7, or Windows XP.

I hope that this post will be helpful for you...
 

Tuesday, 26 May 2015

How to install ubuntu on windows 8 dual boot without CD

Install Ubuntu Linux Alongside Windows 8 or Windows 8.1


In this tutorial, we shall see how to install Ubuntu Linux in dual boot mode with Windows 8 or Windows 8.1.(ubuntu kese install kare windoow 8 ya window 8.1 k sath)

First Read Ubuntu Server Guide Click Here To Download