Install Ubuntu Linux Alongside Windows 8 or Windows 8.1
In this tutorial, we shall see how to install Ubuntu Linux in dual boot mode with Windows 8 or Windows 8.1.(ubuntu kese install kare windoow 8 ya window 8.1 k sath)
First Read Ubuntu Server Guide Click Here To Download
Ubuntu-14.04 LTS
Requires Configuration-
- 700 MHz processor (about Intel Celeron or better)
- 512 MiB RAM (system memory)
- 5 GB of hard-drive space (or USB stick, memory card or external drive but see LiveCD for an alternative approach)
- VGA capable of 1024x768 screen resolution
- Either a CD/DVD drive or a USB port for the installer media
- Internet access is helpful.
Step-1 back Up Your System ..
(i)How to Back Up Your System.
Windows 8’s File History can only back up files in user data locations
like your libraries and desktop folder. If you want to back up an
arbitrary folder elsewhere, you’ll have to add it to your libraries.
Once you set up File History, Windows will save copies of your files
on a regular basis — either to an external drive or a network share. It
does this automatically in the background. If you’re using an external
drive, File History will begin saving backup copies again when you plug
the external drive back in.You can later use File History to “go back in time,” restoring copies of deleted files and previous versions of existing files.


If you’re not entirely happy with Windows’ included backup features, you may also use third party backup software programme, paid backup software programme & cloud backup programme.
Step 2: Create a live USB/disk of Ubuntu
you need to do is to create a live USB or disk. I recommend Universal USB Installer to create a live USB of Linux OS in Windows.
How to create a live USB of Ubuntu Linux in Windows 8.
Steps to create a live USB in Windows:
Step 1: Download Ubuntu ISO
Go to Ubuntu and download the ISO image of your preferred Ubuntu version.You can download Ubuntu from http://www.ubuntu.com/download/desktop.
Step 2: Download Universal USB Installer
Once you have downloaded the ISO of Ubuntu 14.04, go to this page and download the latest version of Universal USB Installer.
Step 3: Creating the live USB
Plugin the USB drive in the computer and
run Universal USB Installer. Choose Ubuntu in type of Linux, browse to
the location of downloaded ISO image and then select USB drive. Don’t
forget to check the format option here.

It will present you with obvious warnings, click Yes.

Wait for sometime for the process to complete. You can push it to background, if you like.

That said, live USB should be created in few minutes.

Once the live USB is created, you can proceed with installation of
Ubuntu 14.04. I hope this tutorial helped you to easily create live USB
of Ubuntu in Windows.
Step 3: Make a partition where Ubuntu will be installed..
To make a partition in Windows 8, go to Disk Management tool. You can
find disk management tool by searching for ‘disk’ in Control Panel .
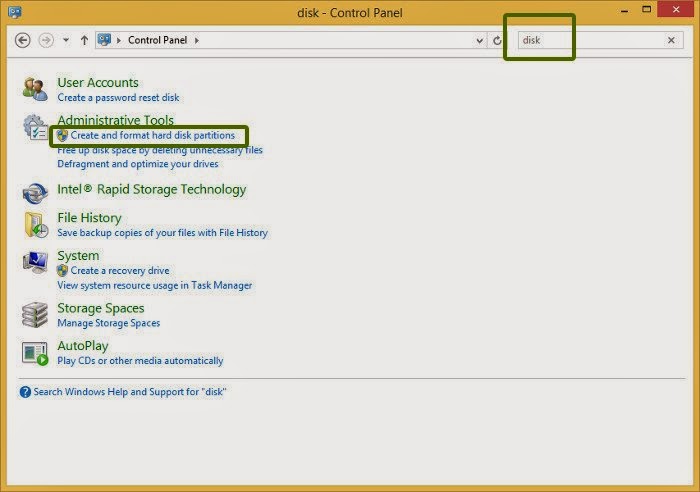
In the Disk Management tool, right click on the drive which you want to partition and select shrink volume. In my case, I shrank the C drive to make some free space:

You can leave the free space as it is. We shall use it while installing Ubuntu.
Step 4: Disable fast startup in Windows [optional]
Windows 8 introduced a new feature
called “fast startup” for quick boot. While it is not mandatory, it
would be better to have it disabled.
Go to Control Panel > Hardware and Sound > Power Options > System Settings > Choose what the power buttons do and uncheck the Turn on fast startup box.
Step 5: Disable secureboot in Windows 8 and 8.1
This is the most important step. The new secure boot feature of Windows 8, originally intended for security feature for
rootkit viruses, prevents dual booting of Windows with Linux. To dual
boot Windows 8 with Linux, we must disable secure boot in UEFI. To learn more about this please follow these step.
- Go to PC settings
- Go to Advanced startup
- Disable secure boot in UEFI
- In Windows 8, you need to go to General PC settings and select Advanced startup and then click on Restart now.
- In Windows 8.1, go to Update and recovery from left sidebar then click Restart now under Advanced startup.
- After you have clicked Restart now button, you will be presented with some options to choose from in the next screen. Select Troubleshoot here.
In Troubleshoot menu, select Advanced options.
In Advanced options menu, choose UEFI Firmware settings. Next, click on Restart button to reboot your system in UEFI settings which ‘may’ seem to have similar interface as BIOS.
Move to Boot tab, there you’ll find Secure Boot option which is set to enabled. Use the arrow key to go to Secure Boot option and then press enter to select it. Use + or – to change its value. Confirm it when prompted. Press F10 to save the changes and exit the UEFI settings.
NOTE- every company pc have their different disable secure boot in UEFI(Unified Extensible Firmware Interface).
Next you’ll be booted in to Windows normally. Now you should be able to dual boot Windows 8 with Ubuntu or other Linux OS.
Step 6: Installing Ubuntu on Windows 8 or Windows 8.1
Once you have disabled secure boot, it’s
time to install Ubuntu. I hope you already created the live USB as
mentioned in step 2. Plug in the USB and boot the system from it.
To boot from USB, will have to choose
boot from USB option from within Windows itself. Either with PC Setting
(like for UEFI) or pressing shift key while clicking on Restart.
Once you have booted in the live USB,
you will be presented with option to try or install Ubuntu. Click on
install. You will be presented with few screen options to choose the
language. It will then do some checks on available space, power and
internet connection etc. Just click on Continue.

The main screen which you should pay attention to is Installation Type. Choose Something else here.
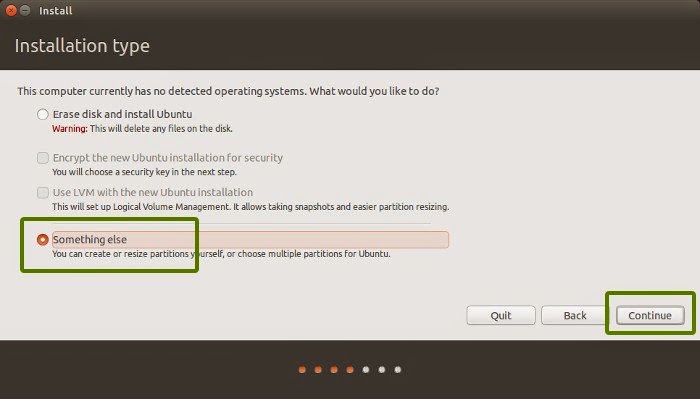
Remember we had created some free space beforehand? We shall use the free space to create Root, Swap and Home. Select the free space and click on the + sign.

It will provide you with option to create Linux partition. We are creating the Root partition. Any thing between 10-20 GB is more than sufficient for it. Choose the size, select Ext 4 as file type and / (means root) as the mount point.

Clicking on OK in previous step will bring you to the partition screen. Next we will create swap. Like previously, click on the + sign again. This time use the file type as Swap area. Suggestible swap size is double of RAM.

In similar fashion, create a Home partition. Allocate it maximum space (in fact allocate it rest of the free space) because this is where you’ll save music, pictures and downloaded files.

Once you are ready with Root, Swap and Home, click on Install Now.

Next you will be asked to set username password etc. Basically, you just need to click next now. Once the installation is completed,
restart the computer, you should be welcomed by a purple grub screen.
Enjoy Ubuntu along with Windows 8 in dual boot mode.
When you are done. then open cmd in ubuntu and type these commands.
sudo apt-get update
and click enter. after processing completed then type,sudo apt-get upgrade
and click enter.sudo apt-get install vim
and click enter.
I hope this blog will be helpful for you..In my next blog we will create and setup developement environment step-by-step in ubuntu.
Very Nice Explanation...
ReplyDeleteGive Me All Details of Magik Eclipse opencart theme
ReplyDelete