(How to create a bootable USB flash drive to install Windows 8 or 8.1)
(How to Make a Bootable USB Disk/Pendrive(PD) for Windows 8, Windows 7, Windows XP) (Pendrive ko bootable kese banaye windows install karne k liye.)

For Windows 8.1 Please Read Windows 8.1 Product Guide Here.
Free Download Windows 8.1 ISO
Windows 8.1 32 bit here
Windows 8.1 64 bit here
After installing window you need to activate it, so i also provide a key to activate windows 8.1.
32 Bit49b428d6fb1a1e53c0682aed76664c2b
64 Bitf9ac831f06a760c722df0df34f1b9397Free Download Windows 8
- A flash drive (4 GB for 32-bit, 8 GB for 64-bit)
- A Windows XP/7/8/8.1 DVD or ISO..
- Access to a working computer (with a DVD drive if you have a Windows 8 DVD) with Windows 8, Windows 7, Windows Vista, or Windows XP installed.
How to Create a Windows 8 Installation DVD or USB Drive
Create bootable USB drives the easy way. (I think this the easiest way, I also tried this at many times)
It can be especially useful for cases where:
- you need to create USB installation media from bootable ISOs (Windows, Linux, UEFI, etc.)
- you need to work on a system that doesn't have an OS installed
- you need to flash a BIOS or other firmware from DOS
- you want to run a low-level utility
Rufus 2.1 (2.2 MB)

Other option for boot pendrive/USB disk/USB flash drive:
Boot pendrive/USB disk/USB flash drive:
To create a bootable USB flash drive the easy way, you can download the Windows 7 USB/DVD download tool
from the Microsoft Store. If you feel adventurous and are comfortable
with command line tools, below are the step-by-step instructions for
installing Windows 8 Developer Preview from a USB flash drive. But be
warned, if you are not comfortable with command line tools, downloading
the Windows 7 USB/DVD download tool is a much better option and will save you the effort of reading the remainder of this blog.
Instructions (using the command line)
At a high level, the steps are:- Mount the Windows 8 Developer Preview ISO image on your computer
- Format a USB flash drive
- Copy the Windows 8 files onto the USB flash drive
- Make the USB flash drive bootable
- Install Windows 8 from the bootable flash drive
Step 1: Mount the Windows 8 Developer Preview ISO image on your computer
The first step is to mount the ISO image on your computer. Since Windows 7 doesn’t have the capability to mount an ISO image, you’ll have to use a 3rd party tool.- Download the Windows Developer Preview ISO image (choose one of the three available)
- Using your favorite ISO image software, mount the ISO image on your computer

Step 2: Format a USB flash drive
In case you’re wondering how big of a USB flash drive you need, an 8GB drive is perfect since it can accommodate any of the three available ISO images. Here are the steps to format a USB flash drive.- Insert a USB flash drive into your computer
- Start a Command Prompt as an Administrator and type diskpart. This starts the Disk Partition tool which you need to use to format the flash drive. Once you see the DISKPART command prompt, type in the following commands
- DISKPART> list disk /* shows list of active disks */
- DISKPART> select disk # /* # is the number for your USB flash drive */
- DISKPART> clean /* deletes any existing partitions on the USB flash drive */
- DISKPART> create partition primary /* create a primary partition on the USB flash drive */
- DISKPART> select partition 1 /* select the newly created partition */
- DISKPART> active /* make the new partition active */
- DISKPART> format FS=NTFS /* format the USB drive with NTFS file system */
- DISKPART> assign /* assign a volume and drive letter to the USB drive */
- DISKPART> exit /* exit Disk Partition */
Step 3: Make the USB flash drive bootable
We just need to make the USB flash drive bootable before copying the files. To do this, you can use the Boot Sector Registration Tool (bootsect.exe) which is located in the boot folder of the Windows 8 ISO image.- Start a Command Prompt as an Administrator and CHDIR into the boot folder of the Windows 8 ISO image, e.g. I:\boot where I:\ is the drive where the ISO image is mounted
- Type bootsect /nt60 E: /* where E: is the drive assigned to the USB flash drive */

Step 4: Copy the Windows 8 files onto the USB flash drive
From a command line, use XCOPY to copy the Windows 8 files to the USB flash drive . In the example below, I:\ is the drive where the ISO image is mounted. F:\ is the USB flash drive.XCOPY I:\*.* F:\ /E /F /H
Step 5: Install Windows 8 from the bootable flash drive
Finally, follow these instructions to install Windows 8 on your computer.- Remove your USB flash drive from your "source" computer and insert it into the "target" computer where you want to install Windows 8
- On the computer where you are installing Windows 8, press the power button to turn on the computer
- During boot up, select the USB flash drive to boot from (if you don't see the USB flash drive as an option, you may have to adjust your BIOS settings)
- Follow the instructions to install Windows 8 Developer Preview

Please follow steps and now you can work on window...yipiieeeeeeee.
Windows 7
The first thing you need is a Windows ISO or an image file. This is a virtual copy of a Windows installation DVD and you can source this legally from Microsoft without a product key. Here are the links for various edition of Windows 7.
Windows 7 Ultimate (32 bit)
Windows 7 Ultimate (64 bit)
Windows 7 Professional (32-bit)
Windows 7 Professional (64-bit)
Windows 7 Home Premium (32-bit)
Windows 7 Home Premium (64-bit)
You'll still need a valid product key when you reinstall Windows so make sure you keep that safely.
Once you've downloaded the Windows 7 ISO file, follow these steps to burn it to a pen drive.
- Download the Windows USB/DVD tool from here and run it.
- Click Browse and select the downloaded Windows 7 ISO file.
- Click Next.
- The next page asks whether you want to save this file to a USB or a DVD. Click USB device.
- Connect a pen drive with at least 4GB space to your computer. Make sure you back up all data on the pen drive to your computer as it will be erased during this process.
- Select your pen drive from the drop down menu and click Begin copying.
- When this process is complete, you'll have a bootable Windows 7 USB ready.

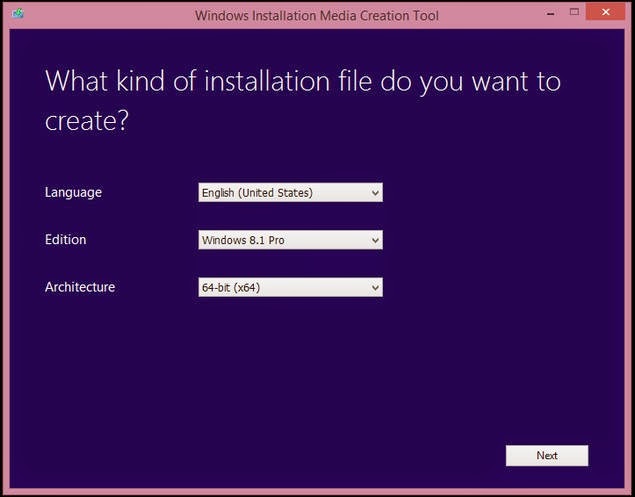
Windows 8
- Download the Windows Installation Media Creation Tool from here and run it.
- Select the Language from the first drop-down menu.
- Then select the Edition of Windows you want to install. Your choices are: Windows 8.1, Windows 8.1 N, Windows 8.1 Pro, Windows 8.1 Pro N and Windows 8.1 Single Language.
- In the third drop-down menu next to Architecture choose whether you want a 32-bit or 64-bit version of the OS. If your computer has less than 3GB RAM, then pick 32-bit. If it has more than 3GB RAM, pick 64-bit. If you need to see which version you're running right now, right click on My Computer and select Properties. There, you'll see the information you need under Windows Edition and System type respectively.
- Click Next.
- Plug in a USB drive to your computer. Make sure that it has at least 4GB space. If there's any important data on the drive, create a backup as this process will erase the pen drive completely.
- Now you'll be asked to choose where to save the ISO file. Choose USB flash drive.
- Click Next.
- You'll see a list of USB drives connected to your computer. Select your pen drive from the list and click Next.
- Now the Media Creation Tool will begin downloading the ISO straight to your pen drive. When the download completes, click Finish.
Warning
-
If you format a partition during installation, any data on the partition will be erased. Be sure to back up any data you want to keep before you begin.
- Go to the Windows XP SP3 ISO download page.
- Select the language from the drop-down menu and click the big red Download button.
- Download a free programme such as ISOtoUSB to burn the image to a pen drive. There are a lot of apps that let you do this and you can use any of these. We found ISOtoUSB easy to use and light, so we picked it over others.
- Install ISOtoUSB on your computer and open it.
- Click Browse and select the downloaded Windows XP ISO file.
- Plug in a pen drive with at least 1GB free space to your computer. All data on this pen drive will be erased so make sure you have a backup.
- In ISOtoUSB, select the pen drive from the drop-down menu.
- Click the checkbox next to Bootable
- Click Burn.
Booting and installing Windows
When you're booting up the computer, on the very first screen, you'll see a text which says something like "Press Del to Enter BIOS". Press whatever key is listed - this is usually Delete, or one of F1, F2, F8, or F12 - when the computer is booting, to enter the BIOS. There, you need to find a menu like Advanced BIOS settings, and select USB as the primary boot device. Now, you need to save and exit BIOS - the key to do so will be listed on-screen, but it is usually F10. Plug in the USB, and when you reboot, you'll start the install process for Windows on your computer. Follow on screen instructions to install Windows 8, Windows 7, or Windows XP.
I hope that this post will be helpful for you...
No comments:
Post a Comment